10
14
2011
9

通过命名管道进行异步通信

需求是这样子的:一个程序要提供一个IPC接口,接收异步的命令。这个接口应该尽量简单,能像/proc下的文件那样通过写入数据来通信,所以我选中了命名管道。读取命名管道很简单,像普通文件那样打开然后读取就可以了。但这样做的问题是,在没有写者的时候open会阻塞。man 2 open下找到了两个标志位:O_ASYNCO_NONBLOCK。我被排在前面的O_ASYNC骗了,它只是读写时使用信号进行异步操作,open依旧阻塞。继续向后翻,才看到O_NONBLOCK,还特意注明了Neither the open() nor any subsequent operations on the file descriptor which is returned will cause the calling process to wait.

试了试,发现open并不像读写时那样在将阻塞时返回EWOULDBLOCK错误,而是返回了一个可用的文件描述符。既然文件描述符都有了,接下来自然毫无悬念地select了。完整的演示代码如下:

#!/usr/bin/env python3
# vim:fileencoding=utf-8

import os
import time
import select

fd = os.open('test', os.O_NONBLOCK | os.O_RDONLY)
while True:
  if not select.select([fd], [], [], 1)[0]:
    print('waiting...')
  else:
    got = os.read(fd, 1024).decode().rstrip()
    if not got:
      os.close(fd)
      fd = os.open('test', os.O_NONBLOCK | os.O_RDONLY)
    else:
      print('got', got)
Category: Linux | Tags: linux python fifo 异步
9
21
2011
2

使用Xtest模拟鼠标点击

最近做一个小工具,需要模拟鼠标点击事件。当然,我可不想去调用 xdotool 或者 xmacro,效率什么不说,光是添加这么个罕见的依赖就不喜欢。顺便也好练习下 C 编程。

Xtest 的函数名长参数列表也长,不过用起来很简单。我所需要调用的函数就两个:

  • XTestFakeMotionEvent:把鼠标光标移动到指定坐标;
  • XTestFakeButtonEvent:模拟鼠标键

Xtest 的函数手册都在一个 manpage 里。看一下就知道用法了。

XTestFakeMotionEvent有五个参数,第一个是Display指针,然后依次是屏幕号、坐标和延时。屏幕号写-1就是默认了。延时我用0就好了。XTestFakeButtonEvent有四个参数,第一个依旧是Display指针,然后是按键号、是不是按下(还是放开按键)、延时。左键是1其它依次递加。不知道为什么这些函数要有个延时的参数。

#include<X11/Xlib.h>
#include<X11/extensions/XTest.h>

/* ... */

int clickAt(int x, int y){
  Display *dpy = XOpenDisplay(NULL);
  if(dpy == NULL){
    return 0;
  }

  XEvent event;

  /* get info about current pointer position */
  XQueryPointer(dpy, RootWindow(dpy, DefaultScreen(dpy)),
      &event.xbutton.root, &event.xbutton.window,
      &event.xbutton.x_root, &event.xbutton.y_root,
      &event.xbutton.x, &event.xbutton.y,
      &event.xbutton.state);

  XTestFakeMotionEvent(dpy, -1, x, y, 0);
  XTestFakeButtonEvent(dpy, 1, 1, 0);
  XTestFakeButtonEvent(dpy, 1, 0, 0);
  /* place the mouse where it was */
  XTestFakeMotionEvent(dpy, -1, event.xbutton.x, event.xbutton.y, 0);
  XCloseDisplay(dpy);
  return 1;
}

这个函数实现了点击指定的屏幕坐标,完事之后再把鼠标光标移回去。最开始是没有移回去的,然后测试的时候我经常找不到鼠标光标了。。。。

C 语言用起来挺不爽的,所以后来做了个 Python 模块。不过功能很不完整,以后有需要时再慢慢加啦。要是谁有兴趣也可以自己加了后给我发 pull request 就更好了。代码地址:https://github.com/lilydjwg/winterpy/blob/master/pyso/X.c,编译命令:

gcc -O2 -shared -lX11 -lXtst `pkg-config --cflags --libs python3` X.c -o X.so

编译后import X,然后help(X)就知道用法了。

Category: Linux | Tags: python C代码 X Window
9
7
2011
19

生成 Awesome 的“应用程序”菜单

Ubuntu 下,Awesome 有个叫 debian_menu 的模块,用于向 Awesome 菜单中添加一个类似于 GNOME 的“应用程序”菜单的项。然而到了 ArchLinux 下,却没这么个模块了。本来我并不太在意,但看到别人折腾后,自己又开始手痒了。

本来是准备自己用 Python 写个程序来生成的,用 pkgfile 一查,却发现有archlinux-xdg-menu这么个软件包,遂装了。原来主要是两个 Perl 脚本。其一生成各种格式的菜单配置,其二根据配置文件为指定的窗口管理器生成菜单配置文件。虽然看示例配置文件似乎不支持 Awesome,但xdg_menu --help一看却是支持 Awesome 的。

xdg_menu --format awesome > ~/.config/awesome/menu.lua

然后改下rc.lua,把这个大菜单加上就可以了:

require("menu")

mymainmenu = awful.menu({ items = { { "Awesome", myawesomemenu, beautiful.awesome_icon },
          -- ...
          { "应用程序 (&A)", xdgmenu },
          -- ...

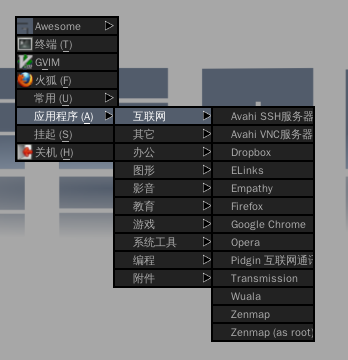
截图如下:

效果不错,只可惜没图标。

又:从 wiki 上看到,原来这菜单可以添加快捷键的,只要在相应字母前加上&符号即可。

2011年12月3日更新dlin帮忙修改了archlinux-xdg-menu,现在有图标了 ;-)

2012年5月28日更新:现在 Arch 下需要稍微修改下命令参数了:

xdg_menu --format awesome --root-menu /etc/xdg/menus/arch-applications.menu > ~/.config/awesome/menu.lua
Category: Linux | Tags: arch awesome
9
7
2011
6

Awesome 中 GIMP 窗口的处理

GIMP一启动就有三个窗口,一个显示图像的,一个工具箱,一个图层什么的。工具箱和图层这些虽然被Awesome自动判为浮动窗口了,但因为显示图像的主窗口是最大化,所以它们经常被图像窗口遮住。将这两个窗口置顶是最简单的办法,但是不太完美。这样它们也会遮住诸如我的浮动终端之类的窗口。

既然是高可配置的Awesome,当然不是没有办法让它们乖乖听话。于是翻翻手册,在我的 rc.lua 里又加了如下代码:

-- {{{2 for GIMP
client.add_signal("focus", function(c)
  if c.class and c.class == 'Gimp-2.6' then
    for _, i in ipairs(c:tags()) do
      for _, j in ipairs(i:clients()) do
        if j.role and (j.role == 'gimp-toolbox' or j.role == 'gimp-dock') then
          j.above = true
        end
      end
    end
  end
end)
client.add_signal("unfocus", function(c)
  if c.class and c.class == 'Gimp-2.6' then
    for _, i in ipairs(c:tags()) do
      for _, j in ipairs(i:clients()) do
        if j.role and (j.role == 'gimp-toolbox' or j.role == 'gimp-dock') then
          j.above = false
        end
      end
    end
  end
end)

这样在 GIMP 的窗口获得焦点时就把那两个窗口置顶,失去焦点时再取消置顶。不过令我有些不解的是,不能给单个的client对象添加信号处理。

8
24
2011
22

改变终端下的光标颜色,包括 screen 和 tmux!

曾经在Ubuntu中文论坛里看到一个改变光标颜色的方法,用光标颜色来指示是在 Vim 的普通模式还是插入模式下(因为 gnome-terminal 不支持使用转义序列改变光标形状)。Vim Wiki 上的 tip

if &term =~ "xterm\|rxvt"
  silent !echo -ne "\e]12;HotPink\007"
  let &t_SI="\e]12;RoyalBlue1\007"
  let &t_EI="\e]12;HotPink\007"
  autocmd VimLeave * :!echo -ne "\e]12;green\007"
endif

可惜它不适用于当时我正在使用的 screen。现在我改用 tmux 了,偶然改变TERM变量测试的时候,发现光标颜色竟然改变了——虽然还附带一些“不良反应”。我想到:一定有办法来正确地改变光标颜色的!

于是求助于 Google,很快找到了这个,有了用于 screen 的转义序列。不过依旧不适用于 tmux。把“tmux”也加到关键词里再搜,终于找到了这个。根据这个帖子,screen 和 tmux 比 xterm 多出来的那些字符序列是告诉 screen 或者 tmux 把其中的字符序列直接发送到终端模拟器处理。

于是,我的 vimrc 又可以更新了:

let color_normal = 'HotPink'
let color_insert = 'RoyalBlue1'
let color_exit = 'green'
if &term =~ 'xterm\|rxvt'
  exe 'silent !echo -ne "\e]12;"' . shellescape(color_normal, 1) . '"\007"'
  let &t_SI="\e]12;" . color_insert . "\007"
  let &t_EI="\e]12;" . color_normal . "\007"
  exe 'autocmd VimLeave * :!echo -ne "\e]12;"' . shellescape(color_exit, 1) . '"\007"'
elseif &term =~ "screen"
  if !exists('$SUDO_UID')
    if exists('$TMUX')
      exe 'silent !echo -ne "\033Ptmux;\033\e]12;"' . shellescape(color_normal, 1) . '"\007\033\\"'
      let &t_SI="\033Ptmux;\033\e]12;" . color_insert . "\007\033\\"
      let &t_EI="\033Ptmux;\033\e]12;" . color_normal . "\007\033\\"
      exe 'autocmd VimLeave * :!echo -ne "\033Ptmux;\033\e]12;"' . shellescape(color_exit, 1) . '"\007\033\\"'
    else
      exe 'silent !echo -ne "\033P\e]12;"' . shellescape(color_normal, 1) . '"\007\033\\"'
      let &t_SI="\033P\e]12;" . color_insert . "\007\033\\"
      let &t_EI="\033P\e]12;" . color_normal . "\007\033\\"
      exe 'autocmd VimLeave * :!echo -ne "\033P\e]12;"' . shellescape(color_exit, 1) . '"\007\033\\"'
    endif
  endif
endif
unlet color_normal
unlet color_insert
unlet color_exit

因为 tmux 的TERM变量和 screen 的一致,所以得使用TMUX变量来判断是在 tmux 里还是在 screen 里。

最后,说下指定颜色的方法。可以使用和 HTML 中一样的#rrggbb甚至简写#rgb,也可以使用颜色名。这里有个 xterm 的颜色名表。

2011年8月25日更新:

写了个 zsh 函数:

if [[ $TERM == xterm* ]] || [[ $TERM == *rxvt* ]]; then # {{{2 设置光标颜色
  cursorcolor () { echo -ne "\e]12;$*\007" }
elif [[ $TERM == screen* ]]; then
  if [[ -n "$TMUX" ]]; then
    cursorcolor () { echo -ne "\ePtmux;\e\e]12;$*\007\e\\" }
  else
    cursorcolor () { echo -ne "\eP\e]12;$*\007\e\\" }
  fi
fi
Category: Linux | Tags: vim 终端 screen zsh tmux
7
31
2011
5

在 ncurses 中使用 readline

有一天,我发现了一个很好用的 Python shell——bpython。它使用了 ncurses 来做界面,使用了 pygments 来高亮代码,怎么看都比 ipython 漂亮,更不用说 Python 自己的了。不过既然它使用了 ncurses,麻烦也就来了——ncurses 不支持 readline!虽然有些模拟,但终究是不好用,M-f M-b不起使用,M-数字也不能用。于是我再次去 google 同时使用 ncurses 和 readline 这两个库的办法。

功夫不负有心人,这次终于 google 到了点有用的东西

The basic idea is to use call rl_callback_read_char() when input from the user is available (determined with select, or similar), then print 'rl_line_buffer' as you would any other string in ncurses, and optionally set A_REVERSE on the position indicated by rl_point. (or just reposition the cursor I guess, either works...)

不过可惜的是,这封邮件给出的代码在我这里并没有跑起来。其实跑起来了也用处不大,因为我需要的那部分代码独立性太差了,还是得重写。

花了一个下午,我终于弄出了一个雏形。

首先,这个rl_callback_read_char()是这么用的(文档):

#include<stdio.h>
#include<readline/readline.h>

int main(void){
  int cont = 1;

  void callback(char *text){
    if(text == NULL){
      rl_callback_handler_remove();
      putchar('\n');
      cont = 0;
    }else{
      printf("%s.\n", text);
    }
  }

  rl_callback_handler_install(">> ", callback);
  while(cont){
    rl_callback_read_char();
  }
  return 0;
}
      

首先安装个回调函数,它将在 readline 读取到一行内容时调用。当标准输入可用的时候,调用rl_callback_read_char()来读取字符。另外注意,这里我用了 gcc 的嵌套函数支持,免得弄出不少全局变量。

知道怎么用rl_callback_read_char()之后,就可以按那封邮件所说的,把它和 ncurses 联合起来了。代码修改自NCURSES Programming HOWTO。思路很简单,readline 负责读取并处理用户输入,显示是自己处理的。不过作为中文用户,纠结了半天的中文问题。最开始是有了 ncurses 之后,中文显示异常。这个是通过setlocale解决的。然后又是光标放的位置不对。于是又用上了我同样不熟悉的 wchar,自己计算光标应该放在哪里。

#define _XOPEN_SOURCE 700       /* for wcswidth and 700 is for mbsnrtowcs */
#include<wchar.h>
#include<ncurses.h>		/* ncurses.h includes stdio.h */
#include<stdlib.h>
#include<string.h>
#include<readline/readline.h>
#include<locale.h>
 
int mygetstr(char *str, int y, int x){
  WINDOW *win;
  int size, col;
  int ok = 0;
  int width;
  wchar_t wstr[80];
  char *p;
 
  getmaxyx(stdscr, size, col);
 
  void getaline(char *s){
    str = s;
    rl_callback_handler_remove();
    ok = 1;
  }
 
  rl_callback_handler_install("", getaline);
  win = newwin(1, col-x, y, x);
  while(1){
    rl_callback_read_char();
    if(ok)
      break;
    werase(win);
    strncpy(str, rl_line_buffer, 80);
    p = str;
    /* how many column chars before cursor occupies? */
    size = mbsnrtowcs(wstr, (const char**)&p, rl_point, 80, NULL);
    width = wcswidth(wstr, size);
    mvwprintw(win, 0, 0, "%s", str);
    /* put the cursor at right column */
    wmove(win, 0, width);
    wrefresh(win);
  }
  delwin(win);
  return 0;
}
 
int main(){
  char mesg[] = "Enter a string: ";
  char str[80];
  int row, col;
 
  setlocale(LC_ALL, "");        /* make ncurses handle Chinese correctly */
  initscr();
  getmaxyx(stdscr, row, col);
  mvprintw(row / 2, (col - strlen(mesg)) / 2, "%s", mesg);
  refresh();
  mygetstr(str, row / 2, (col + strlen(mesg)) / 2);
  mvprintw(LINES - 2, 0, "You Entered: %s", str);
  getch();
  endwin();
 
  return 0;
}
      

注意:此代码只是演示用,缓冲区溢出什么的我都没处理。

终于搞定了 C 下结合两者的使用,接下来 Python 版思路是有了,但因为其标准库 readline 中没有提供rl_callback_read_char()函数,所以只能用 ctypes 了。下面是在 Python 里使用rl_callback_read_char()的示例,ncurses 部分我暂时不想折腾了。

#!/usr/bin/env python3
# vim:fileencoding=utf-8

import sys
import readline
import ctypes
import ctypes.util

rllib_path = ctypes.util.find_library('readline')
rllib = ctypes.CDLL(rllib_path)

def callback(s):
  if s is None:
    rllib.rl_callback_handler_remove()
    sys.stdout.write('\n')
    sys.exit()
  elif not s:
    pass
  else:
    print('%s.' % s.decode())
    # 这样也可以
    # print(readline.get_line_buffer())

cbfunc = ctypes.CFUNCTYPE(None, ctypes.c_char_p)

rllib.rl_callback_handler_install.restype = None
rllib.rl_callback_handler_install(ctypes.c_char_p(b">> "), cbfunc(callback))

while True:
  rllib.rl_callback_read_char()
      

2011年8月4日更新:今天终于完成了个 quick and dirty 的 Python 版:

#!/usr/bin/env python3
# vim:fileencoding=utf-8

import sys
import readline
import ctypes
import ctypes.util
import curses
import struct
from 字符集 import width
 
rllib_path = ctypes.util.find_library('readline')
rllib = ctypes.CDLL(rllib_path)
 
def getstr(win, y, x):
  _, col = win.getmaxyx()
  inputbox = curses.newwin(1, col-x, y, x)
  ret = ''
  ok = False
  def callback(s):
    nonlocal ok, ret
    if s is None:
      rllib.rl_callback_handler_remove()
      raise EOFError
    elif not s:
      ok = True
    else:
      ret = s.decode()
      ok = True
  
  cbfunc = ctypes.CFUNCTYPE(None, ctypes.c_char_p)
  
  rllib.rl_callback_handler_install.restype = None
  rllib.rl_callback_handler_install(ctypes.c_char_p(b""), cbfunc(callback))
  
  while True:
    rllib.rl_callback_read_char()
    if ok:
      break
    inputbox.erase()
    # 这样获取的值不对。。。
    # bbuf = ctypes.string_at(rllib.rl_line_buffer)
    buf = readline.get_line_buffer()
    bbuf = buf.encode()
    inputbox.addstr(0, 0, buf)
    rl_point = struct.unpack('I', ctypes.string_at(rllib.rl_point, 4))[0]
    w = width(bbuf[:rl_point].decode())
    inputbox.move(0, w)
    inputbox.refresh()

  del inputbox

  return ret

msg = '输入字符串:'
win = curses.initscr()
curses.noecho()
row, col = win.getmaxyx()
win.addstr(row // 2, (col - width(msg)) // 2, msg)
win.refresh()
s = getstr(win, row // 2, (col + width(msg)) // 2)
win.addstr(row - 2, 0, '你输入了: ' + s)
win.getch()
curses.endwin()
      
Category: Linux | Tags: C代码 ncurses python readline
6
26
2011
3

使用 LD_PRELOAD 进行文件读写重定向

缘起

换Arch后,我把首选字体改成了这样:

  <match target="pattern">
    <test qual="any" name="family">
      <string>monospace</string>
    </test>
    <edit name="family" mode="prepend" binding="strong">
      <string>DejaVu Sans Mono</string>
      <string>文泉驿等宽正黑</string>
    </edit>
  </match>
  <match target="pattern">
    <test qual="any" name="family">
      <string>serif</string>
    </test>
    <edit name="family" mode="prepend" binding="strong">
      <string>DejaVu Serif</string>
      <string>文泉驿正黑</string>
    </edit>
  </match>
  <match target="pattern">
    <test qual="any" name="family">
      <string>sans-serif</string>
    </test>
    <edit name="family" mode="prepend" binding="strong">
      <string>DejaVu Sans</string>
      <string>文泉驿正黑</string>
    </edit>
  </match>

也就是说,DejaVu 的字体优先于文泉驿的,因为我觉得 DejaVu 的英文字体比文泉驿的好看。这一般没什么问题,除了某些PDF文件,不知道怎么搞的,不嵌入字体也就算了,字体名也奇奇怪怪弄得 evince 不认识。因为太奇怪,并且 evince 显示得更奇怪,我也不好像 KaiTi_GB2312→KaiTi 这样做字体替换了(其实应该用别名的,但当时不会)。想到一个很简单的办法是,让中文字体拥有更高的优先级。实践证明这样做有效。但是,我不希望为了几个乱码的PDF而更改我的全局字体配置。于是,基于 LD_PRELOAD 的解决方案出来了。

LD_PRELOAD 是什么?

LD_PRELOAD 是 Linux 动态链接器认识的一个环境变量(不知道其他系统是否支持)。我看的资料是这个Fun with LD_PRELOAD。原理很简单,使用自己的函数覆盖掉其它动态链接库的。因为 libc 对系统调用都有一个 wrapper,所以正常的程序都会“被骗”的。proxychains 这个让其它程序使用 socks/https 代理的程序的原理就是这个。

我的 hack

我想对指定程序(evince)重定向~/.fonts.conf的读取,所以准备覆盖open这个系统调用。按照从那个PDF的链接中找到的源码的方式,写出了最初的代码。结果用cat测试就失败了——原来还有个 manpage 没说的open64。继续测试,又发现对vi写文件时不起作用。于是加上了第三个要覆盖的函数creat

程序写好后,觉得光重定向一个文件的读写不好玩,稍稍扩展一下,支持配置就强大了。本来想学那个PDF提到的netjail一样用环境变量的。但又觉得不好设计,而且 C 语言真的写起来太麻烦了。于是想到了用 Lua 来配置。后来还想到用 Python 的,但很可惜,段错误了。

#include<stdarg.h>
#include<dlfcn.h>
#include<stdio.h>
#include<stdlib.h>
#include<string.h>
#include<limits.h>
#include<unistd.h>

#include<lua.h>
#include<lualib.h>
#include<lauxlib.h>

static int lib_initialized = 0;
static int (*orig_open)(const char*, int, mode_t) = 0;
static int (*orig_open64)(const char*, int, mode_t) = 0;
static int (*orig_creat)(const char*, mode_t) = 0;
static lua_State *L = NULL;
void lib_init();

void die(char *fmt, ...) {
  va_list args;
  va_start(args, fmt);
  vfprintf(stderr, fmt, args);
  va_end(args);
  fprintf(stderr, "\n");
  fflush(stderr);
  exit(-1);
}

static char* redirect(const char* file){
  int ret;
  const char *new;
  lua_getglobal(L, "redirect");
  lua_pushstring(L, file);
  ret = lua_pcall(L, 1, 1, 0);
  if(ret){
    fprintf(stderr, "取得重定向文件路径时出错了: %s\n", lua_tostring(L, -1));
    lua_pop(L, 1); /* 错误信息 */
    return (char*)file;
  }else{
    new = lua_tostring(L, -1);
    lua_pop(L, 1); /* 返回值 */
  }
  return (char*)new;
}

int open(const char* file, int flags, mode_t mode) {
  lib_init();
  file = redirect(file);
  return orig_open(file, flags, mode);
}

int open64(const char* file, int flags, mode_t mode) {
  lib_init();
  file = redirect(file);
  return orig_open64(file, flags, mode);
}

int creat(const char* file, mode_t mode) {
  lib_init();
  file = redirect(file);
  return orig_creat(file, mode);
}

void lib_init() {
  void *libhdl;
  char *dlerr;

  if (lib_initialized) return;

  if (!(libhdl=dlopen("libc.so.6", RTLD_LAZY)))
    die("Failed to patch library calls: %s", dlerror());

  orig_open = dlsym(libhdl, "open");
  if ((dlerr=dlerror()) != NULL)
    die("Failed to patch open() library call: %s", dlerr);

  orig_open64 = dlsym(libhdl, "open64");
  if ((dlerr=dlerror()) != NULL)
    die("Failed to patch open64() library call: %s", dlerr);

  orig_creat = dlsym(libhdl, "creat");
  if ((dlerr=dlerror()) != NULL)
    die("Failed to patch creat() library call: %s", dlerr);

  int ret;
  L = luaL_newstate();
  luaL_openlibs(L);
  char config[PATH_MAX];
  strcpy(config, getenv("HOME"));
  strcat(config, "/.openredir.lua");
  ret = luaL_dofile(L, config);
  if(ret){
    die("Error run ~/.openredir.lua");
  }
  lua_getglobal(L, "redirect");
  if(!lua_isfunction(L,-1)){
    die("Error run 'redirect' function in openredir.lua");
  }
  lua_pop(L, 1);

  lib_initialized = 1;
}

Makefile 如下:

CC=gcc
CFLAGS=-g -Wall -I/usr/include/lua5.1
LDFLAGS=-ldl -llua

.PHONY: all clean

all: openredir.so

openredir.so: openredir.o
    gcc -shared $< -o $@ $(LDFLAGS)

clean:
    -rm *.o

下面这个是配置文件,要放到~/.openredir.lua才行。

redirect = function(path)
  -- TODO use absolute and normalized path
  io.stderr:write('打开文件 ' .. path .. '\n')
  if path == '/' then
    return '/etc/issue.tty1'
  elseif path == '/home/lilydjwg/.fonts.conf' then
    return '/home/lilydjwg/tmpfs/fonts.conf'
  else
    return path
  end
end

示例:

>>> LD_PRELOAD=./openredir.so cat /
打开文件 /
Arch Linux \r  (\n) (\l)

不过使用时在LD_PRELOAD中最好使用绝对路径,因为某些程序会chdir()到其它地方去的。

最后吐槽下,Lua 里把路径转成 normalize 过的绝对路径都没有现成的函数,囧。。。


2014年11月23日更新:openredir 已经放在 GitHub 上了。

Category: Linux | Tags: C代码 fontconfig linux Lua
6
21
2011
3

Arch 休眠设置

之前因为更改分区把Ubuntu的休眠给弄坏了,现在来到Arch下近一个月了,才发现原来Arch的休眠也有问题——休眠成功了,但是再启动直接重新开始了。内核参数resume=/dev/disk/by-label/swap也加了。Google 一下,很容易就找到了答案——原来这个也要配置!

很简单,在/etc/mkinitcpio.confHOOKS数组里加上resume,然后重新生成 initramfs 即可:

sudo mkinitcpio -p kernel26

有点郁闷,竟然默认不支持,安装系统或者 pm-utils 时也没提示什么的。我之前还以为是内核的resume参数不支持通过磁盘标签指定呢。又找了下,wiki 里倒是有。但是每安装个软件都查查 wiki 也太累了吧,那样还不如回 Ubuntu 呢。

Category: Linux | Tags: arch linux
5
28
2011
5

MediaWiki迁移记

前天我正式切换到了 Arch 下,接下来是繁杂的配置迁移工作,以至于这篇日志现在才写。

虽然之前已经完成了大部分配置,但刚切换到 Arch 下不久,还是发现还有太多的东西要配置。于是像往常一样打开火狐,试图访问自己的维基,看到连接失败的错误页面,才想起我的 MediaWiki 还没迁移过来了。于是先把别的放在一边,装 httpd 和 mediawiki。然后准备迁移数据。这时我更郁闷了:我把相关资料记在了 wiki 里。。。。

于是开始 chroot,进到原先的 Ubuntu 系统中,Apache 启动了,然后是 MySQL。果然悲剧无处不在,因为没经历正常的启动过程,upstart 罢工了。折腾半天,终于手动把 mysqld 跑起来了。原来的 wiki 一切正常,很顺利地找到这个链接。我打算在新 wiki 里使用 SQLite 取代 MySQL,少一个进程,而且省得什么时候服务器跑不起来了。本来还打算使用 nginx 取代 Apache 的,但是在虚拟机里配置失败了。

首先是导出原 wiki 的数据。到 MediaWiki 安装目录下执行类似下边的命令:

php maintenance/dumpBackup.php --full --uploads > wiki-backup.xml
tar -czf wiki-images.tgz images

然后把新 wiki 配置好,再导入数据:

php maintenance/importDump.php wiki-backup.xml
 
mkdir temporary
cp wiki-images.tgz temporary
cd temporary/
tar -xzf wiki-images.tgz
cd ../
mkdir tempimages
cp temporary/images/*/*/* tempimages
php maintenance/importImages.php tempimages

导入页面数据时速度很慢,和导出时形成鲜明对比,不知道是什么原因。导入图片的过程很麻烦,但我不管了,反正有效。以上就是那篇文章上说的步骤。但是这个步骤是不完整的。尝试访问新 wiki,问题就出现了——

首先发现的是首页没改。这个在编辑历史里撒消下就可以了。

然后是统计数据被清零了。恢复后的首页赫然显示“目前已有0条目”。“最近更改”也没有了。在 maintenance 目录下可以找到很多脚本。我看名字选了几个运行:

php maintenance/initStats.php
php maintenance/initEditCount.php
php maintenance/rebuildrecentchanges.php

跑完之后那些统计数据就恢复了。

最后一个问题是:图片全部找不到了!我运行了几个维护脚本,都没效果。图片确实导入了,但是又找不到。无奈之下开始 Google。少顷,在 MediaWiki 官网上找到了答案

php maintenance/rebuildImages.php --missing

原来是要加个--missing参数。

至此,我的 wiki 终于恢复了。以前它一直正常时不觉得什么,这次没有在第一时间让其就绪,才终于知道,自己这两年的近 500 个页面的笔记实在是太有用了!

Category: Linux | Tags: mediawiki wiki
5
6
2011
9

login shell 和 non-login shell 不同造成的问题

上篇说到,我在Arch下的tmux的部分环境变量有问题。于是接下来我开始调查原因。最后终于真相大白。不过在揭露真相前,先详细说说问题是什么。

自从使用zsh以后,我在Ubuntu下发现我在~/.profile中设置PATH变量的代码在tty下没有起作用。但在~/.zshrc中设置又不行,因为图形界面登录时不会读取~/.zshrc。source 它也不行,因为可能导致双重设置(在一段时间里,我总是很奇怪地发现命令补全时某些命令会出现两次。。。)。于是,最后我的方案是这样的(箭头表示 source):

.profile --> .zsh/zshrc.env   <-+
.zshrc --> ZSHRC_ENV set? --No--+

这个方案在Ubuntu下一直工作良好。但在Arch+tmux下就出问题了。在tmux中的zsh启动前,ZSHRC_ENV已经设置,于是~/.zsh/zshrc.env没有被 source,于是$PATH设置得不对了。。。

在查阅tmux N次之后,我想,可能是某个启动文件覆盖了我自己的 PATH 变量的设置。于是打开 zsh 的文档,翻到这里:

5.1 Startup/Shutdown Files

Commands are first read from /etc/zsh/zshenv; this cannot be overridden. Subsequent be- haviour is modified by the RCS and GLOBAL_RCS options; the former affects all startup files, while the second only affects global startup files (those shown here with an path starting with a /). If one of the options is unset at any point, any subsequent startup file(s) of the corresponding type will not be read. It is also possible for a file in $ZDOTDIR to re-enable GLOBAL_RCS. Both RCS and GLOBAL_RCS are set by default.

Commands are then read from $ZDOTDIR/.zshenv. If the shell is a login shell, commands are read from /etc/zsh/zprofile and then $ZDOTDIR/.zprofile. Then, if the shell is interactive, commands are read from /etc/zsh/zshrc and then $ZDOTDIR/.zshrc. Finally, if the shell is a login shell, /etc/zsh/zlogin and $ZDOTDIR/.zlogin are read.

于是发现这一切的根源在于tmux里启动的是login shell!Arch的/etc/profile中重置了$PATH/etc/profile.d/locale.sh中重置了$LANG,所以造成我的tmux下的zsh环境变量不对的问题。于是我把设置移回了~/.profile中,然后将软链接~/.zprofile指向它。locale.shpacman不知道是什么包的,所以我就把它改成了:

[ -z "$LANG" ] && export LANG=en_US.UTF-8

至此,tmux部分的问题终于解决了!

Category: Linux | Tags: arch linux zsh tmux

| Theme: Aeros 2.0 by TheBuckmaker.com