10
12
2011
27

Windows 版 gvim 7.3.333 打包/安装程序下载

下载链接在这里

好久没有编译 Windows 版 gvim 了。这次又编译了一次,同时支持 Python 2.7 和 Python 3.2 的,并且可以同时使用哦!另外还弄了个安装包出来,不过 Vim 自带的那个 NSIS 配置文件nsis/gvim.nsi似乎过时很久了,编译的时候各种错误。于是第一次接触 NSIS 的我就不得不去改那个配置文件。令人郁闷的是,NSIS 和 make 不同,每次重新编译时它都要全部重新处理一遍!最终弄出来后还发现没有多语言翻译的消息文件。于是装上 gettext,去src/po下 make 了,却发现不知道怎么改 NSIS 配置来处理这些.mo文件的重命名问题。于是只好放弃,另用 7zip 打包了一个包含消息文件的版本。

最后吐槽下,下载 NSIS 和 gettext 等时,正好遇到 SourceForge 故障,下载地址返回了条 JSON 消息:

{
    "error": true
}

还是被 JSONView 插件格式化好的。。。


2011年10月31日更新:搞定了交叉编译,于是安装包的语言支持被我用 shell 脚本搞定了!

Category: Vim | Tags: vim windows NSIS
10
7
2011
82

fcitx.vim 1.0 正式发布

Fcitx 输入法自动切换

在离开/重新进入插入模式时自动切换输入法状态,以便在普通模式下始终是英文输入模式,切换回插入模式时恢复离开时的输入法输入模式。状态为每个缓冲区单独保存,所以在中文文档和英文代码间交叉跳转编辑也得心应手!

无需任何配置!


要求:

fcitx 版本 3.6 以上,建议 fcitx 4.0 以上。建议关闭 fcitx 的预编辑输入功能,否则在 GVim 中可能会有问题(见评论;最新 git 版 fcitx 已经能够在 GVim 中自动禁用预编辑输入)。

注意事项:

1. Python 3 或者 Python 支持以获得更快更好的效果。注意对于 vim 版本<7.3.288,如果同时编译了 Python 2 & 3 支持,因为此 vim 不能同时运行两个版本的 Python,而本脚本首先检查 Python3,所以会导致出错或者 Python 2 不可用。

2. 终端下请设置 Vim ttimeoutlen 选项为较小值(如100),否则退出插入模式时会有较严重的延迟。同样会造成延迟的还有 screen 的 maptimeout 选项以及 tmux 的 escape-time 选项。

如果你需要跨主机使用 fcitx.vim,请参考此文

开发:

https://github.com/lilydjwg/fcitx.vim

安装:

解压到 ~/.vim 下即可。如果没有并且不准备使用 Python 接口,可只将 so/fcitx.vim 放到 ~/.vim/plugin 目录下。


插件地址http://www.vim.org/scripts/script.php?script_id=3764

Category: Vim | Tags: vim fcitx
10
7
2011
9

找回火狐的双击标签页组空白新建标签页功能

前两天更新到了火狐7,却发现双击标签页组的空白地方没有了反应。最开始以为是插件不兼容或者是bug,没想到搜索了下,却发现是个“feature”。
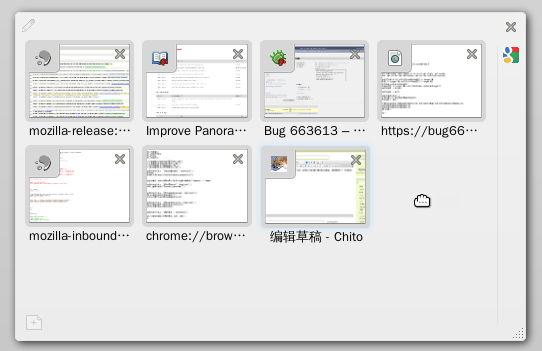
这个 bug 报告中,Mozilla 认为这样可以简化标签页组的操作。我是从这个帖子找到这个 bug 报告的。楼主The_Ben 说

I would be more than happy to see this being re-implemented in FF7, as I use it all the time, I find it to be the most convenient way to open a new tab in a tab group I have (and I'm not currently present at obviously, for that I have cmd+t).

看来不是我一个人喜欢这个功能。那么,让我把它找回来吧,就像找回状态栏、地址栏中的RSS按钮以及https://一样。

根据 bug 报告上的链接,我找到了这个补丁。看样子把这个补丁反着打上去就好。不过找到正确的文件却花了好长时间,还下载了共 1.2G 的火狐源代码来找寻,好在并不需要重新编译。

要修改的位置位于源代码中的groupitems.js文件中,它被tabview.js包含了,所以要修改的文件是这个tabview.js。到火狐的安装目录/usr/lib/firefox-7.0下没找到这个文件,只有omni.jar。这是个非标准的 zip 文件。使用unzip程序可正确解压,然后打上以下补丁:

diff -Nuar omni_orig/chrome/browser/content/browser/tabview.js omni/chrome/browser/content/browser/tabview.js
--- omni_orig/chrome/browser/content/browser/tabview.js	2010-01-01 00:00:00.000000000 +0800
+++ omni/chrome/browser/content/browser/tabview.js	2011-10-07 13:47:32.623127202 +0800
@@ -2304,6 +2304,10 @@
   this.keepProportional = false;
   this._frozenItemSizeData = {};
 
+  // Double click tracker
+  this._lastClick = 0;
+  this._lastClickPositions = null;
+
   // Variable: _activeTab
   // The <TabItem> for the groupItem's active tab.
   this._activeTab = null;
@@ -3871,6 +3875,28 @@
   _addHandlers: function GroupItem__addHandlers(container) {
     let self = this;
 
+    // Create new tab and zoom in on it after a double click
+    container.mousedown(function(e) {
+      if (!Utils.isLeftClick(e) || self.$titlebar[0] == e.target || 
+          self.$titlebar.contains(e.target)) {
+        self._lastClick = 0;
+        self._lastClickPositions = null;
+        return;
+      }
+      if (Date.now() - self._lastClick <= UI.DBLCLICK_INTERVAL &&
+          (self._lastClickPositions.x - UI.DBLCLICK_OFFSET) <= e.clientX &&
+          (self._lastClickPositions.x + UI.DBLCLICK_OFFSET) >= e.clientX &&
+          (self._lastClickPositions.y - UI.DBLCLICK_OFFSET) <= e.clientY &&
+          (self._lastClickPositions.y + UI.DBLCLICK_OFFSET) >= e.clientY) {
+        self.newTab();
+        self._lastClick = 0;
+        self._lastClickPositions = null;
+      } else {
+        self._lastClick = Date.now();
+        self._lastClickPositions = new Point(e.clientX, e.clientY);
+      }
+    });
+
     var dropIndex = false;
     var dropSpaceTimer = null;
patch -p1 < patch

然后把文件弄回原来的 jar 包里面。这里用到了源代码中的config/optimizejars.py文件把标准 zip 文件弄成原样。估计不弄也可以,只是效率会差一些。

7z a -tzip omni.jar
python2 ~/src/mozilla-release/config/optimizejars.py --optimize . . .
sudo mv omni.jar /usr/lib/firefox-7.0

然后重启火狐即可。只不过这样,以后火狐更新时又得重新弄一遍。

2011年11月9日更新:火狐 8 终于把这个特性加回来了。

2011年11月11日更新:火狐 8 还是不尽如人意,只是双击空白区域会新建标签页,双击标签页组时并不是这样。更新后的 patch 如下,同时去掉了新建组后将焦点置于组标题的行为:

diff -Nuar omni_orig/chrome/browser/content/browser/tabview.js omni/chrome/browser/content/browser/tabview.js
--- omni_orig/chrome/browser/content/browser/tabview.js	2010-01-01 00:00:00.000000000 +0800
+++ omni/chrome/browser/content/browser/tabview.js	2011-11-11 00:30:18.629851334 +0800
@@ -1290,7 +1290,7 @@
         drag.info.stop();
 
         if (!this.isAGroupItem && !this.parent) {
-          new GroupItem([drag.info.$el], {focusTitle: true});
+          new GroupItem([drag.info.$el]);
           gTabView.firstUseExperienced = true;
         }
 
@@ -2328,6 +2328,10 @@
   this.keepProportional = false;
   this._frozenItemSizeData = {};
 
+  // Double click tracker
+  this._lastClick = 0;
+  this._lastClickPositions = null;
+
   this._onChildClose = this._onChildClose.bind(this);
 
   // Variable: _activeTab
@@ -3901,41 +3905,26 @@
   // Helper routine for the constructor; adds various event handlers to the container.
   _addHandlers: function GroupItem__addHandlers(container) {
     let self = this;
-    let lastMouseDownTarget;
 
+    // Create new tab and zoom in on it after a double click
     container.mousedown(function(e) {
-      let target = e.target;
-      // only set the last mouse down target if it is a left click, not on the
-      // close button, not on the expand button, not on the title bar and its
-      // elements
-      if (Utils.isLeftClick(e) &&
-          self.$closeButton[0] != target &&
-          self.$titlebar[0] != target &&
-          self.$expander[0] != target &&
-          !self.$titlebar.contains(target) &&
-          !self.$appTabTray.contains(target)) {
-        lastMouseDownTarget = target;
-      } else {
-        lastMouseDownTarget = null;
+      if (!Utils.isLeftClick(e) || self.$titlebar[0] == e.target ||
+          self.$titlebar.contains(e.target)) {
+        self._lastClick = 0;
+        self._lastClickPositions = null;
+        return;
       }
-    });
-    container.mouseup(function(e) {
-      let same = (e.target == lastMouseDownTarget);
-      lastMouseDownTarget = null;
-
-      if (same && !self.isDragging) {
-        if (gBrowser.selectedTab.pinned &&
-            UI.getActiveTab() != self.getActiveTab() &&
-            self.getChildren().length > 0) {
-          UI.setActive(self, { dontSetActiveTabInGroup: true });
-          UI.goToTab(gBrowser.selectedTab);
-        } else {
-          let tabItem = self.getTopChild();
-          if (tabItem)
-            tabItem.zoomIn();
-          else
-            self.newTab();
-        }
+      if (Date.now() - self._lastClick <= UI.DBLCLICK_INTERVAL &&
+          (self._lastClickPositions.x - UI.DBLCLICK_OFFSET) <= e.clientX &&
+          (self._lastClickPositions.x + UI.DBLCLICK_OFFSET) >= e.clientX &&
+          (self._lastClickPositions.y - UI.DBLCLICK_OFFSET) <= e.clientY &&
+          (self._lastClickPositions.y + UI.DBLCLICK_OFFSET) >= e.clientY) {
+        self.newTab();
+        self._lastClick = 0;
+        self._lastClickPositions = null;
+      } else {
+        self._lastClick = Date.now();
+        self._lastClickPositions = new Point(e.clientX, e.clientY);
       }
     });
 
@@ -8967,7 +8956,7 @@
       let box = item.getBounds();
       if (box.width > minMinSize && box.height > minMinSize &&
          (box.width > minSize || box.height > minSize)) {
-        let opts = {bounds: item.getBounds(), focusTitle: true};
+        let opts = {bounds: item.getBounds()};
         let groupItem = new GroupItem([], opts);
         self.setActive(groupItem);
         phantom.remove();
      

2012年6月7日更新: 火狐13的代码更改了,添加了dblclick事件绑定函数,不需要自己追踪单击事件了。更新后的代码如下:

diff -Nuar omni_old/chrome/browser/content/browser/tabview.js omni/chrome/browser/content/browser/tabview.js
--- omni_old/chrome/browser/content/browser/tabview.js  2010-01-01 00:00:00.000000000 +0800
+++ omni/chrome/browser/content/browser/tabview.js  2012-06-07 16:49:49.174753472 +0800
@@ -1500,7 +1500,7 @@
         drag.info.stop();

         if (!this.isAGroupItem && !this.parent) {
-          new GroupItem([drag.info.$el], {focusTitle: true});
+          new GroupItem([drag.info.$el]);
           gTabView.firstUseExperienced = true;
         }

@@ -4142,40 +4142,8 @@
     let self = this;
     let lastMouseDownTarget;

-    container.mousedown(function(e) {
-      let target = e.target;
-      // only set the last mouse down target if it is a left click, not on the
-      // close button, not on the expand button, not on the title bar and its
-      // elements
-      if (Utils.isLeftClick(e) &&
-          self.$closeButton[0] != target &&
-          self.$titlebar[0] != target &&
-          self.$expander[0] != target &&
-          !self.$titlebar.contains(target) &&
-          !self.$appTabTray.contains(target)) {
-        lastMouseDownTarget = target;
-      } else {
-        lastMouseDownTarget = null;
-      }
-    });
-    container.mouseup(function(e) {
-      let same = (e.target == lastMouseDownTarget);
-      lastMouseDownTarget = null;
-
-      if (same && !self.isDragging) {
-        if (gBrowser.selectedTab.pinned &&
-            UI.getActiveTab() != self.getActiveTab() &&
-            self.getChildren().length > 0) {
-          UI.setActive(self, { dontSetActiveTabInGroup: true });
-          UI.goToTab(gBrowser.selectedTab);
-        } else {
-          let tabItem = self.getTopChild();
-          if (tabItem)
-            tabItem.zoomIn();
-          else
-            self.newTab();
-        }
-      }
+    container.dblclick(function(e) {
+        self.newTab();
     });

     let dropIndex = false;
@@ -9944,7 +9912,7 @@
       let box = item.getBounds();
       if (box.width > minMinSize && box.height > minMinSize &&
          (box.width > minSize || box.height > minSize)) {
-        let opts = {bounds: item.getBounds(), focusTitle: true};
+        let opts = {bounds: item.getBounds()};
         let groupItem = new GroupItem([], opts);
         self.setActive(groupItem);
         phantom.remove();

2012年7月29日更新: 火狐14又有新动作,见此文

Category: 火狐 | Tags: 火狐
9
29
2011
4

Flash 游戏 Music Catch 2 hack 攻略

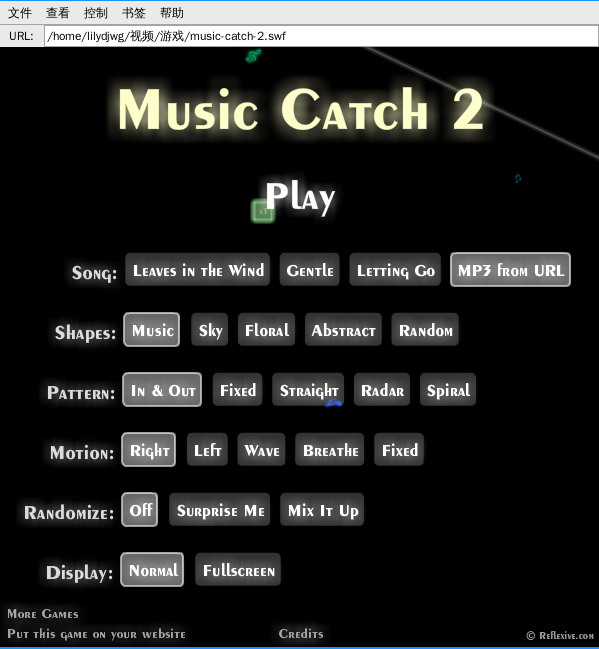
Music Catch 是 Reflexive 出品的一款音乐游戏,其PC版本收费,但有两个免费的Flash版本。版本一是一个非常有限的预览版,只内置了一首音乐;版本二不仅内置了更多音乐,并拥有更多选项,它还支持从URL获取外部音乐:

不过,这些选项要逐个解锁——即完成它们。好不容易全部解锁后,终于可以播放自己的歌曲了。搭建个HTTP服务器,却发现需要公网能访问才行,而且速度死慢死慢的——因为它是从自家的网站的一个代理获取歌曲文件的。这也是Flash跨域请求的限制。简单抓包下就可以知道该怎么对付了。

首先修改 hosts 文件,把那个代理劫持到自己机器上:

127.0.0.1       wgextras.gamecentersolution.com

然后是crossdomain.xml文件,把它放自己的根目录下。

<cross-domain-policy>
    <site-control permitted-cross-domain-policies="master-only"/>
    <allow-access-from domain="*"/>    
</cross-domain-policy>

最后是那个代理脚本了,路径是/proxy.php。我简单地用PHP写了个:

<?php
# 为 Music Catch 2 而写
# 使其可以直接从本地读取音乐文件
error_reporting(0);
if($_POST['MusicCatch']){
  $mp3 = file_get_contents($_GET["url"]);
  header("Content-Length: ".strlen($mp3));
  header("Last-Modified: ".gmdate("F d Y H:i:s")." GMT");
  header("Connection: close");
  header("Accept-Ranges: bytes");
  header("Content-Disposition: attachment; filename=\"song.mp3\"");
  header("Content-Type: audio/mpeg");
  echo $mp3;
}else{
  header("HTTP/1.1 400 Bad Request");
?>
<title>400 Bad Request</title>
<h1>400 Bad Request</h1>
<hr/>
<p>This page is intended for Music Catch 2.</p>
<?php
}
?>

就是这样。现在再从URL加载音乐时,只需要一两秒的时间了。

最后,Music Catch 2 SWF 文件下载

Category: 未分类 | Tags: flash 网络
9
29
2011
15

调教火狐地址栏

火狐 7 把链接开头的http://隐藏了。有些人觉得简洁我却觉得不爽。虽然已经确定完全复制时火狐像以前一样聪明,会连同http://一起复制,但是部分复制时就不好办了,比如我前边那个知乎的链接就去掉了 query 和 hash 部分。另外,有人说改 http 为 https 时不方便。我一直在用 Redirector 插件,倒不太在意这个。

那么,作为可定制性极高的一款浏览器,在火狐中如何把这个http://加回来呢?答案比想像的要简单很多:打开 about:config 页面,查找键名browser.urlbar.trimURLs,双击使其值从true变为false即可。(改 about:config 时不需要重启的哦~)

既然写成了博文,当然不止会说这一项设置啦。Vayn 提出地址栏文本双击时会全选,而不是像其它地方一样只选中一个单词。这个也困扰着我,但把双击改成拖选并不太难,所以以前没管。这次经过一些尝试性的搜索后,发现这个也在 about:config 里可以设定。至于全选整个URL嘛,三击就是了嘛。另外也有个选项设定首次单击时全选。

另外还有几个挺有用的选项,在此一并附上:

browser.ctrlTab.previews
Ctrl-Tab切换时预览(以前版本的为browser.allTabs.previews)。默认为false
browser.urlbar.trimURLs
是否显示链接中的http://(火狐7+)。默认为true
browser.urlbar.clickSelectsAll
单击地址栏时首先选中整个 URL。默认为false
browser.urlbar.doubleClickSelectsAll
双击地址栏时选中整个 URL。默认为true
browser.tabs.animate
新建或关闭标签页时是否使用动画。默认为true,禁用后速度可能会有较大提升
browser.tabs.insertRelatedAfterCurrent
是否在当前标签页的旁边(而不是最右边)打开标签页。默认为true
Category: 火狐 | Tags: 火狐
9
24
2011
8

通过PyGObject调用GDK截图

Linux 下截个图挺麻烦的。最开始我想学 scrot 使用 Xlib,结果因为看不懂而放弃,转而使用GDK。搜到了TualatriX的这篇《几十行代码构造一个截屏软件》。虽然才不到50行的 C 代码,但我还是觉得有点长。

本来准备像上次的《使用Xtest模拟鼠标点击》一样写成 Python 模块的,后来从 Vayn 那里看到原来可以通过 PyGObject 来调用 GTK 及 GDK 等等(hello world 程序)。于是我也用这种方式完成了截图的代码,才十几行,原理和TualatriX的完全一样。

import mimetypes
from gi.repository import Gdk

def screenshot(filename, rect=None, filetype=None):
  screen = Gdk.Screen.get_default()
  if rect is None:
    rect = (0, 0, screen.width(), screen.height())
  if filetype is None:
    t = mimetypes.guess_type(filename)[0]
    if t is None:
      raise ValueError('cannot guess filetype for filename: %s' % filename)
    filetype = t.split('/')[1]

  rootwin = screen.get_root_window()
  pixbuf = Gdk.pixbuf_get_from_window(rootwin, *rect)
  pixbuf.savev(filename, filetype, (), ())

不过没有找到PyGObject的文档。官方说可以自己从 gir 文件生成,但是那个脚本在最新版的代码中才有,而那个代码也要求Glib非常新,我的 Arch 上都没有那么新,于是作罢。所以用法除了自己按 GDK 的文档猜就是 Google 了。那个savev的参数我都找到mono的文档去了。。。

PyGObject 默认是使用 GTK 3。也可以指定使用 GTK 2:

import gi
gi.require_version("Gdk", "2.0")
gi.require_version("Gtk", "2.0")
from gi.repository import Gdk, Gtk

/usr/lib/girepository-1.0/下还有一些typelib文件,说明这些库都有 GObject Introspection 支持,可以用包括 Python 3 在内的任何其支持的语言访问。不过我调用 xlib 时出错了:

>>> from gi.repository import xlib
>>> d = xlib.open_display()
Traceback (most recent call last):
  File "<stdin>", line 1, in <module>
  File "/usr/lib/python3.2/site-packages/gi/types.py", line 44, in function
    return info.invoke(*args)
glib.GError: Could not locate XOpenDisplay: `XOpenDisplay': python3: undefined symbol: XOpenDisplay

GObject Introspection 这个东西挺好的,除了文档。文档啊,就算不能支持 Python 的 docstring,至少也弄个 HTML 版出来啊,现在只有堆 XML 文件叫我怎么情何以堪啊,现在用 PyGObject 写代码就像在猜谜。。。

最后,代码的 github 链接

Category: python | Tags: gtk linux python
9
21
2011
2

使用Xtest模拟鼠标点击

最近做一个小工具,需要模拟鼠标点击事件。当然,我可不想去调用 xdotool 或者 xmacro,效率什么不说,光是添加这么个罕见的依赖就不喜欢。顺便也好练习下 C 编程。

Xtest 的函数名长参数列表也长,不过用起来很简单。我所需要调用的函数就两个:

  • XTestFakeMotionEvent:把鼠标光标移动到指定坐标;
  • XTestFakeButtonEvent:模拟鼠标键

Xtest 的函数手册都在一个 manpage 里。看一下就知道用法了。

XTestFakeMotionEvent有五个参数,第一个是Display指针,然后依次是屏幕号、坐标和延时。屏幕号写-1就是默认了。延时我用0就好了。XTestFakeButtonEvent有四个参数,第一个依旧是Display指针,然后是按键号、是不是按下(还是放开按键)、延时。左键是1其它依次递加。不知道为什么这些函数要有个延时的参数。

#include<X11/Xlib.h>
#include<X11/extensions/XTest.h>

/* ... */

int clickAt(int x, int y){
  Display *dpy = XOpenDisplay(NULL);
  if(dpy == NULL){
    return 0;
  }

  XEvent event;

  /* get info about current pointer position */
  XQueryPointer(dpy, RootWindow(dpy, DefaultScreen(dpy)),
      &event.xbutton.root, &event.xbutton.window,
      &event.xbutton.x_root, &event.xbutton.y_root,
      &event.xbutton.x, &event.xbutton.y,
      &event.xbutton.state);

  XTestFakeMotionEvent(dpy, -1, x, y, 0);
  XTestFakeButtonEvent(dpy, 1, 1, 0);
  XTestFakeButtonEvent(dpy, 1, 0, 0);
  /* place the mouse where it was */
  XTestFakeMotionEvent(dpy, -1, event.xbutton.x, event.xbutton.y, 0);
  XCloseDisplay(dpy);
  return 1;
}

这个函数实现了点击指定的屏幕坐标,完事之后再把鼠标光标移回去。最开始是没有移回去的,然后测试的时候我经常找不到鼠标光标了。。。。

C 语言用起来挺不爽的,所以后来做了个 Python 模块。不过功能很不完整,以后有需要时再慢慢加啦。要是谁有兴趣也可以自己加了后给我发 pull request 就更好了。代码地址:https://github.com/lilydjwg/winterpy/blob/master/pyso/X.c,编译命令:

gcc -O2 -shared -lX11 -lXtst `pkg-config --cflags --libs python3` X.c -o X.so

编译后import X,然后help(X)就知道用法了。

Category: Linux | Tags: python C代码 X Window
9
16
2011
11

有一天...

有一天,电子和正电子相爱了……

Category: 文学 | Tags: 爱情 物理
9
7
2011
19

生成 Awesome 的“应用程序”菜单

Ubuntu 下,Awesome 有个叫 debian_menu 的模块,用于向 Awesome 菜单中添加一个类似于 GNOME 的“应用程序”菜单的项。然而到了 ArchLinux 下,却没这么个模块了。本来我并不太在意,但看到别人折腾后,自己又开始手痒了。

本来是准备自己用 Python 写个程序来生成的,用 pkgfile 一查,却发现有archlinux-xdg-menu这么个软件包,遂装了。原来主要是两个 Perl 脚本。其一生成各种格式的菜单配置,其二根据配置文件为指定的窗口管理器生成菜单配置文件。虽然看示例配置文件似乎不支持 Awesome,但xdg_menu --help一看却是支持 Awesome 的。

xdg_menu --format awesome > ~/.config/awesome/menu.lua

然后改下rc.lua,把这个大菜单加上就可以了:

require("menu")

mymainmenu = awful.menu({ items = { { "Awesome", myawesomemenu, beautiful.awesome_icon },
          -- ...
          { "应用程序 (&A)", xdgmenu },
          -- ...

截图如下:

效果不错,只可惜没图标。

又:从 wiki 上看到,原来这菜单可以添加快捷键的,只要在相应字母前加上&符号即可。

2011年12月3日更新dlin帮忙修改了archlinux-xdg-menu,现在有图标了 ;-)

2012年5月28日更新:现在 Arch 下需要稍微修改下命令参数了:

xdg_menu --format awesome --root-menu /etc/xdg/menus/arch-applications.menu > ~/.config/awesome/menu.lua
Category: Linux | Tags: arch awesome
9
7
2011
6

Awesome 中 GIMP 窗口的处理

GIMP一启动就有三个窗口,一个显示图像的,一个工具箱,一个图层什么的。工具箱和图层这些虽然被Awesome自动判为浮动窗口了,但因为显示图像的主窗口是最大化,所以它们经常被图像窗口遮住。将这两个窗口置顶是最简单的办法,但是不太完美。这样它们也会遮住诸如我的浮动终端之类的窗口。

既然是高可配置的Awesome,当然不是没有办法让它们乖乖听话。于是翻翻手册,在我的 rc.lua 里又加了如下代码:

-- {{{2 for GIMP
client.add_signal("focus", function(c)
  if c.class and c.class == 'Gimp-2.6' then
    for _, i in ipairs(c:tags()) do
      for _, j in ipairs(i:clients()) do
        if j.role and (j.role == 'gimp-toolbox' or j.role == 'gimp-dock') then
          j.above = true
        end
      end
    end
  end
end)
client.add_signal("unfocus", function(c)
  if c.class and c.class == 'Gimp-2.6' then
    for _, i in ipairs(c:tags()) do
      for _, j in ipairs(i:clients()) do
        if j.role and (j.role == 'gimp-toolbox' or j.role == 'gimp-dock') then
          j.above = false
        end
      end
    end
  end
end)

这样在 GIMP 的窗口获得焦点时就把那两个窗口置顶,失去焦点时再取消置顶。不过令我有些不解的是,不能给单个的client对象添加信号处理。

Mastodon | Theme: Aeros 2.0 by TheBuckmaker.com